10 fun Easter Bakes for the Bank Holiday with Tesco
Take advantage of the long Easter weekend by filling it with sweet baked treats. From chocolatey cakes and bunny biscuits to buns in all shapes and sizes, these fun recipes are all perfect for an Easter afternoon tea.
Hot cross bunnies
Kids will love this adorable twist on traditional hot cross buns, shaping the dough into cute, long-eared bunnies instead. What’s more, the orange-scented dough is also flavoured with white chocolate chips for extra sweetness!

Ingredients
7g sachet fast-action dried yeast
175g caster sugar, plus 1 tbsp extra
300ml milk, warmed but not hot or steaming, plus 3 tbsp for decorating
600g strong white bread flour
1 tbsp mixed spice
½ tsp ground cinnamon
⅛ ground nutmeg
2 oranges, zested
75g unsalted butter, chilled and diced
1 tsp orange extract
175g mixed dried fruit, plus about 10g for eyes
200g white chocolate chips
sunflower oil, for greasing
1 egg yolk, mixed with 1 ½ tbsp milk
50g plain flour
Method
Mix the yeast in a small bowl with the 1 tbsp sugar. Add 4 tbsp of the warm milk and set aside for 5 mins to activate the yeast.Put the flour, 125g of the sugar, the spices, orange zest and butter in a second bowl. Use your fingertips to rub the mixture together until it resembles breadcrumbs. Stir through the orange extract and dried fruit. Add the yeast mix and most of the remaining warm milk and mix to a sticky dough, adding more milk if the mixture is dry or crumbly. You might not need it all. Tip out onto a lightly floured surface and knead for 10 mins or until the dough is smooth and elastic. Add the chocolate chips and knead for a further 2 mins until evenly distributed.
Place the dough on a lightly greased baking sheet and cover with lightly oiled clingfilm. Leave in a warm place to rise for 1-2 hrs or until doubled in size.
Divide the risen dough into 16 equal balls, then roll each into an oval. Use scissors to make a horizontal cut a third of the way into each oval to make the ears, then shape the tops of the ears with your fingers so they are rounded. Divide between 2 greased baking trays, leaving enough space between them for each to double in size. Cover again with the oiled clingfilm and leave somewhere warm for 1 hr.
Preheat the oven to gas 5, 190 ̊C, fan 170 ̊C. Carefully reshape the bunnies if necessary. Brush the egg yolk mixture evenly over the buns. Mix the plain flour with 3 tbsp milk and spoon into a piping bag with a 2mm round nozzle. Pipe ears, eyes, a ‘cross’ nose and a mouth, then stick on raisins or currants for the eyes. Bake for 15 mins until golden, and hollow-sounding when tapped on the underside. Transfer to a wire rack.
In a small pan, heat the remaining 50g sugar and 2 tbsp hot water over a medium heat until the sugar has dissolved. Brush the syrup over the buns; set aside to cool. Store in an airtight container at room temperature for up to 3 days.
Easter gravity cake
This showstopping gravity-defying cake will impress even your most discerning guests. Filled with chocolate, double cream and cherry jam and topped with mini Easter eggs, this is the ultimate indulgent dessert. This wow-factor cake is perfect for an extravagant Easter or birthday celebration.

Ingredients
250g unsalted butter, at room temperature
250g caster sugar
2 tsp vanilla bean paste
5 eggs
325g self-raising flour
120g natural yogurt
For the filling and ganache
110g unsalted butter, diced
140g dark chocolate (70% cocoa solids)
120ml double cream
100g cherry jam
To decorate
70g dark chocolate (70% cocoa solids)
25g unsalted butter, melted
2 shredded wheat
150g mini eggs
1 small Easter egg
Method
To make the vanilla cake, preheat the oven to gas 4, 180°C, fan 160°C. Grease a deep 20cm round cake tin and line with nonstick baking paper.
Put the butter and sugar into a large bowl and use an electric hand whisk to beat together, until light and fluffy. Add the vanilla and eggs (one at a time), beating until fully combined before adding the next. Add half the flour, then half the yogurt, beating between additions. Repeat, until all of the flour and yogurt have been fully combined.
Scrape the batter into the lined tin and bake in the oven for about 1 hr 20 mins, or until a skewer inserted into the middle of the cake comes out clean. Leave to cool in the tin for 20 mins before carefully turning out onto a wire rack to cool completely.
While the cake is in the oven, make the ganache. Put the butter and chocolate in a bowl set over a pan of barely simmering water, stirring occasionally, until fully melted. Remove from the heat and pour in the cream, mixing until silky and smooth in texture. Set aside to cool slightly, until thick and spreadable.
To assemble the cake, use a serrated knife to cut the cake into 3 even layers. Put the bottom layer of cake onto a cake stand and spread with half the jam, topping with the second layer of cake. Repeat with the third layer. Using a knife or palette knife, spread the ganache evenly over the top and sides of the cake, until fully coated.
To decorate, melt 50g of the chocolate and the butter in a heatproof bowl set over a pan of simmering water, stirring occasionally, until fully melted. Remove the bowl from the heat and crumble in the shredded wheat, mixing until evenly coated in the chocolate mixture. Form this mixture into a ring-shaped nest on top of the cake, leaving a border of roughly 2.5cm around the outside edge of the cake.
Cut a wooden skewer down to 25cm in length. Vertically press the skewer down into the centre of the cake. Push a plastic bendy straw over the top of the skewer and into the cake to secure.
Fill the nest on top of the cake with mini eggs, piling them up slightly in the middle around the straw.
To decorate, melt the remaining chocolate in a bowl set over a pan of simmering water. Using a very sharp knife, carefully cut a small hole (about the size of the straw) in the side of the Easteregg near the narrower end. Take care to avoid the join in the Easter egg, or it may shatter.
Carefully push the straw into the Easter egg via the hole you have cut and mark on the straw where the egg will rest. Add a little chocolate to the back of each of the remaining mini eggs and press onto the straw, holding in place until the chocolate has started to set and the mini eggs feel secure. Add enough mini eggs until you reach the mark where the large Easter egg will rest. When ready to serve, carefully fix the Easter egg on the skewer.
Giant cinnamon bun
What’s better than a cinnamon bun? A giant one, of course! Delicately spiced with cardamon and cinnamon and drizzled with icing, this wonderful bake will definitely impress. Practise your dough making skills and get ready to to amaze your guests with this fun baking idea.

Ingredients
500g strong white bread flour, plus extra for dusting
4 cardamom pods, seeds removed and finely crushed
½ tsp fine salt
7g sachet fast-action dried yeast
280ml milk, plus 4 tsp
220g butter, at room temperature, plus extra for greasing
1 large egg, lightly beaten
vegetable oil, for greasing
170g light soft brown sugar
2 tbsp ground cinnamon
70g currants
65g icing sugar
Method
Mix the flour, crushed cardamom seeds, salt and yeast in a bowl, then make a well in the centre. Gently warm the 280ml milk and 30g butter in a small saucepan until the butter has just melted, then pour into the flour mix; add the egg. Mix until a dough forms, then tip onto a lightly floured surface and knead for 5-10 mins until the dough is smooth and stretchy. Lightly grease a bowl with oil and put the dough in. Cover and leave to rise in a warm place for 1 hr or until doubled in size.
Mix the remaining butter, the brown sugar and cinnamon until well combined; set aside. Lightly grease a 20cm loose-bottomed cake tin with a little butter.
Turn out the risen dough onto a lightly floured surface and knead a few times to knock the air out. Roll out to a rectangle about 40 x 30cm with the shorter ends on the left and right. Spread over the cinnamon butter and sprinkle with the currants.
Cut the dough horizontally into 4 strips. Roll the top strip into a spiral, then place at the end of the second strip and roll it around the first. Repeat with the next 2 strips until you have a large spiral. Put the spiral in the cake tin, loosely cover with oiled clingfilm, and leave to rise for another 30 mins in a warm place. Preheat the oven to gas 5, 190°C, fan 170°C and put in a baking tray to warm.
Put the tin on the hot tray and bake for 1 hr 10 mins, loosely covering with foil after 30 mins. Just before you remove the bun from the oven, mix the icing sugar with the 4 tsp milk. As soon as you remove the bun, drizzle over the icing using the back of a spoon. Leave to cool in the tin for 30 mins, then transfer to a plate. Cut into wedges to serve.
Meringue chicks
Take your mini meringues up a notch and turn them into super cute chicks with just a little food colouring and plenty of craftiness. These cracking sweet treats make a great Easter gift and are the ideal way to keep the kids busy in the kitchen.

Ingredients
2 medium egg whites, at room temperature
120g caster sugar (or double the weight of your egg whites)
½ tsp vanilla extract
yellow food colour gel
black food colour gel
orange food colour gel
Method
Preheat the oven to gas ½, 130 ̊C, fan 110 ̊C. Line 2 baking trays with nonstick baking paper. Put the egg whites in a large, clean, non-plastic bowl and beat with an electric whisk, starting on a low speed and gradually increasing to high. Whisk for 4 mins or until you have a stiff mix that holds its peaks.
Add the sugar, 1 tbsp at a time, whisking well between additions, until all the sugar is incorporated. Continue whisking for a further 5 mins or until the sugar has completely dissolved.
Once the meringue is smooth and glossy, whisk in the vanilla and a little yellow food colour gel until the mixture is bright yellow and not streaky. Spoon the meringue into a piping bag fitted with a round 1cm nozzle.
Pipe 22 small circles onto the lined baking tray, 2cm apart, then carefully pipe a smaller circle on top of each one, finishing with a peak.
Bake for 40 mins. When the meringues are ready they will pull off the paper easily. If they don’t, return them to the oven for a few more mins until they do. Set aside to cool for 30 mins.
Put 2 drops each of the black and orange food colour gels in separate small bowls. Using a new fine paintbrush, mix 1-2 drops of water into each colour. Paint eyes, beaks, feet and head feathers onto the chicks. Leave to dry for 30 mins. The chicks can be stored in an airtight container at room temperature for up to 1 week. As part of a healthy diet, we recommend this recipe for a special occasion or treat.
Lemon, ginger and almond simnel-style cake
A modern-twist on the classic simnel cake which is traditionally eaten at Easter. This gorgeous, colourful cake combines a subtle blend of lemon and ginger, which perfectly complements the creamy, smooth white chocolate icing, making this deliciously moist cake all the more impressive. A brilliant way to round off your Easter feast!

Ingredients
3 lemons, finely zested plus 7 tbsp juice
150g crystallized ginger, finely chopped (or stem ginger, well drained)
250g butter, softened
250g golden caster sugar
6 large eggs, separated
225g self-raising flour, sifted
2 tsp ground ginger
175g ground almonds
For the white chocolate ganache
300g white chocolate, broken into squares
150ml double cream
35g butter
For the white chocolate butter icing
125g butter, softened
225g icing sugar
1 tbsp milk
50g white chocolate, melted and cooled
For the marzipan balls
250g natural marzipan
edible gold dusting powder
blue gel food colouring
purple gel food colouring
pink gel food colouring
green gel food colouring
Method
To make the cake, preheat the oven to 180°C, 160°C fan, gas 4. Grease the sides of 2 20cm round, deep, loose-based cake tins. Line the bases with baking paper.
Mix the lemon rind and juice with the chopped ginger and set aside. Put the butter and sugar in a large mixing bowl and using an electric whisk, beat until pale, smooth and creamy.
Add the egg yolks, one at a time and beat well after each addition. Fold half of the flour, ground ginger and ground almonds into the mixture followed by half of the lemon and ginger mixture. Repeat with the remaining flour, almonds and lemon and ginger mixture.
Using a clean electric whisk, beat the egg whites until white, foamy and stiff. Add a large spoonful to the cake mixture and fold in to loosen the mixture a little. Using a large metal spoon, carefully fold the remaining egg white in to the mixture until well combined. Divide the mixture between the prepared tins and bake for 35 mins or until a skewer comes out clean when inserted into the centre of the cake. Cool in the tin for 5 mins then turn out on to a wire cooling rack and leave until completely cool.
Meanwhile, make the white chocolate ganache. Put the chocolate and cream in a heatproof bowl. Stand the bowl over a pan of barely simmering water (without letting the water touch the base of the bowl) and heat gently, stirring occasionally until the chocolate has melted. Alternatively microwave on high for 1-1½ mins. Add the butter and remove the bowl from the pan. Beat in the butter and cool. Chill for 35-45 mins or until the mixture thickens to a spreading consistency.
Meanwhile, make the buttercream: place the butter, icing sugar and milk in a bowl and beat until smooth and combined. Stir in the cooled, melted chocolate. Set aside at room temperature.
When the cakes are cold sandwich them together with a thin layer of the white chocolate ganache, placing the flattest side of the top cake uppermost. Using a palette knife, spread the buttercream all over the top and sides of the cake, making it as smooth as possible. Chill for 10-15 mins until firm.
Using a palette knife spread the remaining white chocolate ganache over the top and sides of the cake. Chill while making the marzipan balls.
To make the marzipan balls: Divide the marzipan into 5 pieces, making one piece slightly larger than the rest; divide this into 3 and roll into balls. Sprinkle some of the gold dusting powder over a small plate and roll the marzipan balls in it to coat. Colour the remaining pieces of marzipan using a few drops of each of the colourings. Shape each colour into 2 balls. Arrange on top of the cake and serve.
Bunny twist bakes
Give your Easter celebrations a new twist with these fun, bunny-shaped rolls. Made with a simple spiced bread dough, you and the kids can have fun twisting it into cute bunny shapes. They are gorgeous as they are, or you can give them a sweet touch with a fluffy coconut tail.

Ingredients
250g strong white flour, plus extra for dusting
7g fast-action yeast
½ tsp salt
1 tsp mixed spice
½ tsp cinnamon
2 tsp caster sugar
1½ tbsp olive oil, plus extra for greasing
1 free-range egg, beaten
For the fluffy coconut tails (optional):
1 tsp honey
3 tsp desiccated coconut
Method
Mix the flour, yeast, salt, spices and sugar together in a large mixing bowl. Make a well in the centre and pour in the olive oil and 150ml lukewarm water. Mix well until the dough starts to come together (add a splash more warm water if needed), then tip onto a floured work surface and knead for 5-7 mins until you have a smooth, springy dough.
Roll the dough into a large sausage shape and cut into 6 even pieces. Roll one piece of dough into a thin strand (about 35cm long). Cut 1cm off the end and roll into a smooth ball for the tail; set aside.
Lie one long strand in a ‘U’ shape on the work surface. Hold one end in each hand and cross over each other twice to form a twist, leaving a small loop at the bottom to form the body and to leave a hole for the tail.
Line a baking tray with baking paper. Carefully transfer the bunny twist to the tray and flatten slightly to help it hold its shape. Pinch or trim the ends of the dough into pointed shapes to make the ears. Brush the hole in the loop (the bunny body) with a little water and place the reserved ball for the tail inside.
Repeat steps 2-4 with the remaining pieces of dough to form 6 bunny shapes. Cover the tray loosely with oiled clingfilm (to stop it sticking) and set aside in a warm place to rise for 45 mins, or until doubled in size.
Preheat the oven to gas 4, 180°C, fan 160°C. Brush the bunnies with the beaten egg and bake for 30-35 mins until lightly golden. They should sound hollow when tapped underneath.
If adding the fluffy tails, lightly brush or dab the tails with honey and sprinkle over the coconut. Leave to cool slightly on a wire rack before serving, or cool completely and store in an air-tight container until needed.
Meringue eggs
Eggstra special sweet treats for you to enjoy, these Meringue eggs have a gorgeous coconut filling and are topped with vibrant passion fruit. A fun and creative treat that’s simple to make and delicious to eat!

Ingredients
150ml passion fruit juice
few drops yellow food colouring
1 tbsp cornflour
2 tsp caster sugar, for sprinkling
4 medium egg whites
225g caster sugar
1 x 250g tub Coyo dairy-free coconut milk yogurt
icing sugar, for dusting
Method
Preheat the oven to gas ¼, 100°C, fan 80°C. Line 2 baking sheets with nonstick baking paper.
Place the passion fruit juice and yellow food colouring in a pan. Mix the cornflour with 2 tbsp water to a smooth paste. Add to the juice and mix well. Bring up to the boil, stirring until thickened. Pour into a bowl and sprinkle with 2 tsp of caster sugar (this will prevent a skin forming). Leave until cold, cover with cling film and chill in the fridge for a couple of hrs.
Meanwhile, place the egg whites in a clean, grease-free bowl and, using an electric hand whisk, beat until white, foamy and stiff. Gradually add the sugar, a little at a time, beating well after each addition. It’s important not to add the sugar too quickly or to add too much or the meringues will not stiffen. When all the sugar has been added and you have a stiff, glossy mixture, using a large spoon, place 8 dollops of mixture on the baking sheets. Make sure they are spaced well apart.
Make a well in the centre of each dollop with the back of a small spoon. Bake for 1 ¼ hrs until the base is firm but the meringues are still pale. Turn off the oven and leave the door slightly ajar with the meringues still inside. Leave the meringues like this for at least 1 hour or overnight.
When the meringues are cold, dust with icing sugar then fill the well with the coconut yoghurt. Level the yoghurt then spoon over the passion fruit sauce. Serve straight away with remaining passion fruit sauce.
Bee cupcakes
Kids will love these cute bee cupcakes and they can help you prepare them, too. Studded with white chocolate chips and given a fresh lift with orange zest, these are perfect for a bee-themed birthday party or Easter celebration.

Ingredients
125g unsalted butter, softened
125g golden caster sugar
2 eggs
125g self-raising flour
1 tsp baking powder
1 orange, zested
2 tbsp milk
50g white chocolate chips
For the icing
100g white chocolate
150g unsalted butter, softened
140g icing sugar, sifted
For the bees
100g yellow fondant icing
50g black fondant icing
12 white chocolate buttons
black or brown writing icing pen
Method
Preheat the oven to gas 4, 180°C, fan 160°C. Fill a 12-hole muffin tin with yellow paper cupcake cases.
Get the kids to help you put 125g butter into a large bowl, add the caster sugar and beat with an electric whisk until pale and fluffy. Carefully crack the eggs into the bowl one at a time and beat well between each addition. Sift over the flour and baking powder, and fold in using a large metal spoon. Add half the orange zest and the milk, and carefully fold the mixture until it is smooth. Stir in the white chocolate drops.
Using a teaspoon, the kids can divide the mixture between the cupcake cases then smooth the tops with the back of the teaspoon. Put the muffin tin into the oven and bake the cupcakes for 18 mins, or until well-risen, golden and lightly springy to touch.
Remove the tin from the oven and carefully transfer the cupcakes to a wire rack to cool completely.
Meanwhile, make the icing. Break the white chocolate into squares, put in a non-metallic bowl and melt the chocolate in 30-sec bursts in the microwave, stirring between each burst, until just melted; set aside to cool. Alternatively, if you don’t have a microwave, put the chocolate squares into a bowl that fits snugly over a pan of gently simmering water on a gentle heat. Make sure the water does not touch the bottom of the bowl or the chocolate will seize. Leave, stirring occasionally, until the chocolate has melted.
The kids can help you put the butter and icing sugar into a large bowl then beat with an electric whisk until pale and fluffy. Fold in the melted chocolate and the remaining orange zest. Place a straight nozzle into the base of a piping bag and fill with the icing.
Once the cupcakes are cool, pipe the icing onto the top of each cupcake in a swirl that looks like a beehive.
For the bees, break and roll the yellow fondant icing into 12 small slightly oval shaped balls about 2.5-3cm long. Break off a piece of black fondant and roll it with the tips of your fingertips on a board until it is a sausage shape approximately 3mm thick and 14cm long. Cut this into 2 pieces and then wrap 1 piece round the yellow body to make a stripe. Wrap the other sausage round the body next to the first stripe. Cut the white chocolate buttons in half then put them on the back of the body to resemble wings. Draw eyes and a smiley mouth on the front of each bee using the writing icing pen, then set aside for 10 mins to allow the icing to set. Put a bee onto the side of each cupcake, and serve.
Bunny paw biscuits
Shaped like cute bunny paw prints, these easy Easter biscuits make a fun baking project to try with the kids or to make for friends and family. Little hands are ideal for rolling and shaping the simple vanilla biscuit dough and making the thumbprints ready for icing. White or pink icing looks most like traditional ‘paws’ but you could try any colour you like.

Ingredients
100g butter, softened
100g light soft brown sugar
1 large egg, beaten
vanilla extract
275g plain flour, sifted, plus extra for dusting
For the icing
1 large egg, separated
125g icing sugar, sifted
pink food colour gel (optional)
Method
Cream together the butter and sugar in a large bowl, then add the egg and a few drops of vanilla extract and mix well. Add the flour and stir until the dough starts to come together then tip out onto a lightly floured work surface and knead gently until it forms a smooth ball of dough. Wrap in clingfilm and chill for 30 mins.
Divide the chilled dough into 20 pieces (each weighing about 25g). You will need 2 pieces of dough per biscuit. Roll the first piece into a smooth ball. Split the second piece into 3 and roll each into a small ball.
Line a baking tray with baking paper for the finished biscuits, then place another piece of baking paper on the work surface to shape them on (so that they don’t stick). Take one of the larger balls and place on the paper. Use a little water to wet one side, then position the 3 smaller balls along this edge (to create the ‘toes’), using the water to stick them in place.
Press down with the palm of your hand over all 4 balls to flatten them slightly – the overall biscuit should be about ½cm thick. Make indents for the icing in the middle of the paw and within each ‘toe’ using your thumb or forefinger. The biscuits will puff up quite a lot in the oven so make sure the indentations are quite firm – if the dough cracks, use a little water to help smooth it back into shape.
Transfer the shaped biscuit to the lined baking tray and repeat with the remaining dough. Cover the tray with clingfilm and place in the fridge to chill for another 30 mins.
Meanwhile, preheat the oven to gas 4, 180°C, fan 160°C. Bake the chilled biscuits for 30-35 mins until golden, then transfer to a wire rack and leave to cool completely.
To make the icing, place the egg white in a bowl and whisk gently until frothy (reserve the egg yolk for another recipe, see tip below). Whisk in the icing sugar gradually until fully incorporated and continue whisking for 5 mins or until the icing holds soft peaks. If using the food colour, stir through a few dots of the gel to reach your desired colour.
Use a teaspoon (or small piping bag) to carefully fill each indent in the cooled biscuits with the icing. You may want to tip or jiggle the biscuits to help the icing flow into the holes evenly. Leave the icing to set before serving.
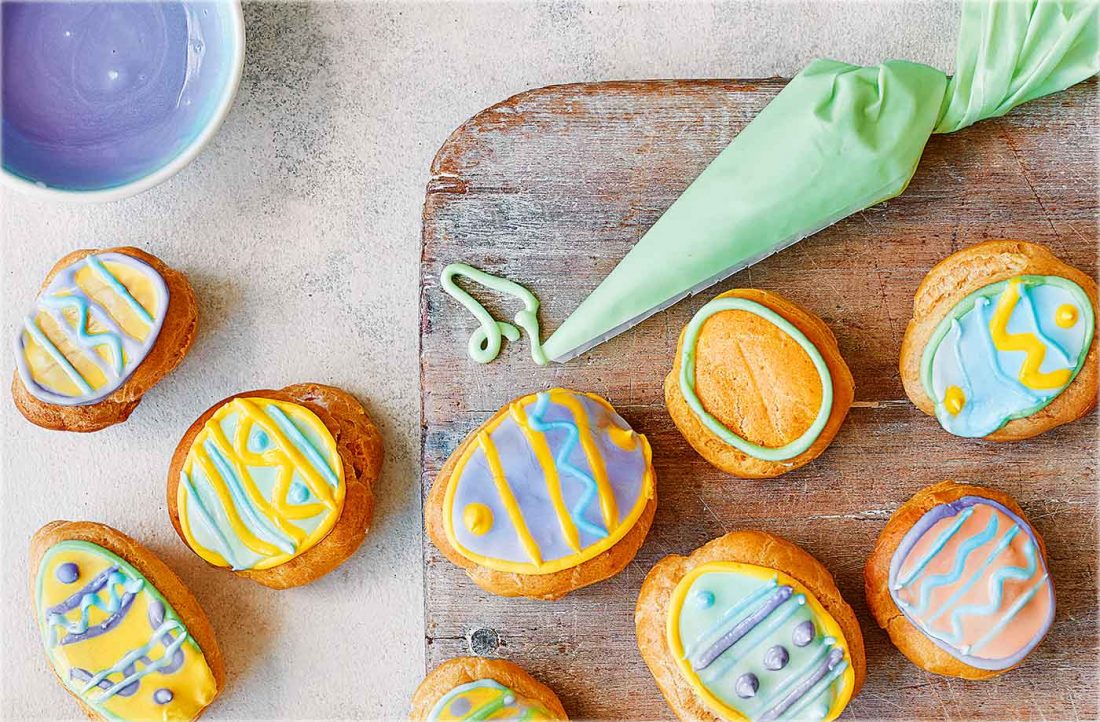
Mini Easter egg choux buns
We’ve given classic choux buns a vibrant Easter makeover! Topped with pretty, pastel-coloured Easter egg decorations and filled with a fruity raspberry cream, these gorgeous sweet treats are sure to stand out at your Easter celebration.

Ingredients
60g plain flour
1 tsp caster sugar
50g unsalted butter, diced, plus extra for greasing
2 free-range eggs, beaten
For the filling and decoration
200ml whipping cream
2 tbsp icing sugar
1 tsp vanilla extract
100g raspberries, crushed
250g royal icing sugar
food colour gels, in various colours
Method
Preheat the oven to gas 6, 200 ̊C, fan 180 ̊C. In a bowl, mix together the flour and sugar. Melt the butter with 150ml water in a medium saucepan over a low heat. Bring to the boil, then add the flour and sugar in one go. Remove from the heat and beat with a wooden spoon for 2 mins until the mixture forms a smooth ball that leaves the sides of the saucepan clean.
Tip into a bowl and leave to cool for 5 mins. Gradually add the egg, 1 tsp at a time, beating until you have a smooth, shiny paste. Lightly grease 2 sheets of baking paper and place on 2 baking trays, greased-side up. Spoon the paste into a piping bag with a 1cm round nozzle and pipe 16 egg shapes (6cm tall x 5cm wide), leaving a 5cm gap between each one (see tip below).
Bake for 10 mins, then increase the oven temperature to gas 7, 220 ̊C, fan 200 ̊C and bake for another 15 mins until the choux buns are light golden brown and firm to the touch. Remove from the oven and pierce the underside of each bun with a skewer to allow the steam to escape; cool on a wire rack.
Meanwhile, make the filling. Whip the cream with the icing sugar, then gently fold in the vanilla extract and crushed raspberries. Pipe the cream into the cooled buns through the steam hole.
Sift the royal icing sugar into a bowl and add 3 tbsp cold water. Beat together with an electric whisk on the lowest speed for 2–3 mins until you have a smooth, stiff consistency. Depending on the number of food colours you’re using, divide the icing into separate bowls and add a different food colour to each one to create pastel colours.
Next, spoon a third of each of the coloured icings into separate disposable piping bags. Cut off the ends to create a 1-2mm hole, then pipe an egg outline onto each choux bun.
Add a few drops of water to the remaining icings to create a thick but slightly runny icing that spreads out on its own within 15 secs but doesn’t run off the edge of the choux. Spoon into the piping bags of the same colour and use to carefully fill the outlines. Decorate with other colours to look like bright Easter eggs. The icing will be touch-dry in 30 mins but will take 4 hrs to completely set. The buns will keep for 2-3 days in the fridge.